This article covers how to create/edit a word document using Powershell. When we need to create word reports on a regular basis, we can automate this to avoid spending more time on documentation, sometimes it’s boring to do the same reports every day by changing a few items in the documents (It’s my friend’s comment), also we may miss changing something like a date, name, etc. in the document which is very important. We can automate documentation when we pull the reports from either a server, system or from a database using PowerShell and insert the report into the word document to have an automated word documenting the system. We can also trigger an email from PowerShell by attaching these word documents which means reports are fully automated are using com abject to interact with office applications from PowerShell. Below are the com object for office application and we are using the word com abject to interact with a word using PowerShell.
Word.Application
Excel.Application
PowerPoint. application
Outlook.Application
Please refer to the below link to understand more about the office Object model. Before we start, make sure that we have installed MS office application on the machine
https://docs.microsoft.com/en-us/office/vba/api/overview/
New-Object –ComObject Word.Application
I have highlighted the important properties in the object, please have a look.

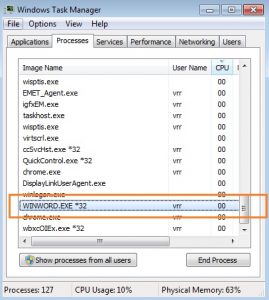
As soon as you executed the cmdlet, you can see a word processor in the task manager, please go to task manager and check if you got a word process (Close all the other word document you opened before executing the cmdlet to make sure that that word is executed from PowerShell)
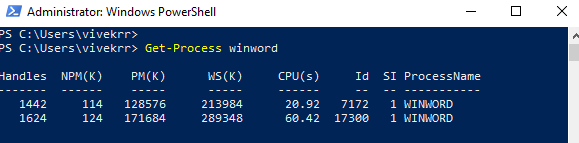
You can also check the process status using PowerShell as shown below.
We need to enable word visibility if you need to see the word document on the screen. I have highlighted the “Visible” property in the screenshot for your reference. To enable visibility, follow the below cmdlet, this cmdlet is the same for all office applications.
$Word.Visible = $True
Once you execute the cmdlet you can see the Microsoft Word pup up with a blank page
Let’s start – I am printing a simple asset inventory report in the word document, this is a small example that shows how to create, format, and save the word document using PowerShell
$Word = New-Object -ComObject word.application $Word.Visible = $true
$Docs = $Word.Documents.Add()
$Selection = $Word.Selection
Below are the few formatting which I have done, you can see the word color code from the below link, please note that some of the formattings do not work if you are not using the latest PowerShell version
https://docs.microsoft.com/en-us/dotnet/api/microsoft.office.interop.word.wdcolor?view=word-pia
$Selection.Style = 'Heading 1'
$Selection.Font.Bold = 1
$Selection.Font.Color = '26367'
After the formatting, we can start adding the information into the word document. The information can be stored in a PowerShell variable after collecting from preferred sources, I am collecting a few system information using a WMI query and passing the information to a word document. Below is the information I am collecting for our word document.
$Sysdetails = Get-WmiObject -Class Win32_computersystem  | select -ExpandProperty TotalPhysicalMemory
$Osname = Get-WmiObject -Class Win32_OperatingSystem | select -ExpandProperty caption
I have collected the machine’s operating system name and total physical memory available on the machine Follow the below command to write the collected information in a word document, after executing the command you can see the information is appearing in the word document, I have used a TypeParagraph() command which will print the details in the next line
$Selection.TypeText("Server Inventory Report for $(get-date) ")
$Selection.TypeParagraph()
$Selection.TypeParagraph()
$Selection.TypeText("Operating System Name = $osname")
$Selection.TypeParagraph()
$Selection.TypeText("Physical Memory = $sysdetails")
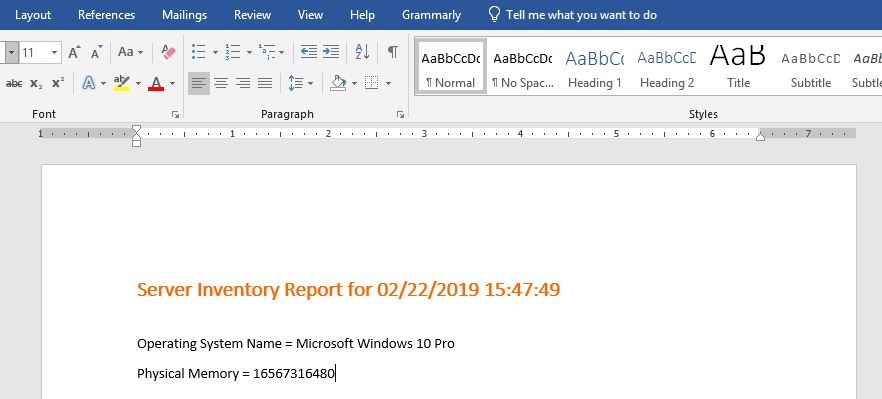
Finally, we got the below word document created using PowerShell ?
We need to save the document now, follow the below command to save the word document. $WordPath = “D:TempTestDocument.docx”
$Docs.SaveAs([ref]$WordPath,[ref]$SaveFormat::wdFormatDocument)
$Word.Quit()