- Azure Registration : As you know we have to register in azure to use all the stuff. Below is the azure sing up Sign In link. One month free trial available.
- Azure PowerShell module Installation : You can download and Install Azure Powershell from the below URL. After the installation, you will be able to find a new console named Microsoft Azure Powershell on you start.Download Azure PowerShell module
- Azure Publish settings file download and configure : We have to download our azure publish file from our azure subscription. Follow the below steps to do that..
PS C:>
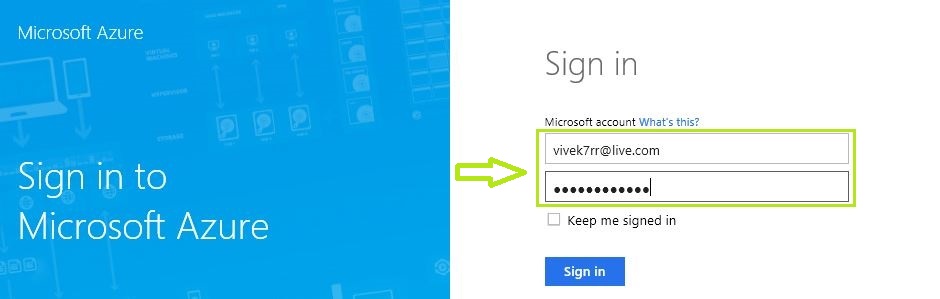
This command will take you to azure log in page as showing below. You will have to provide your azure credential which you have registered prior.
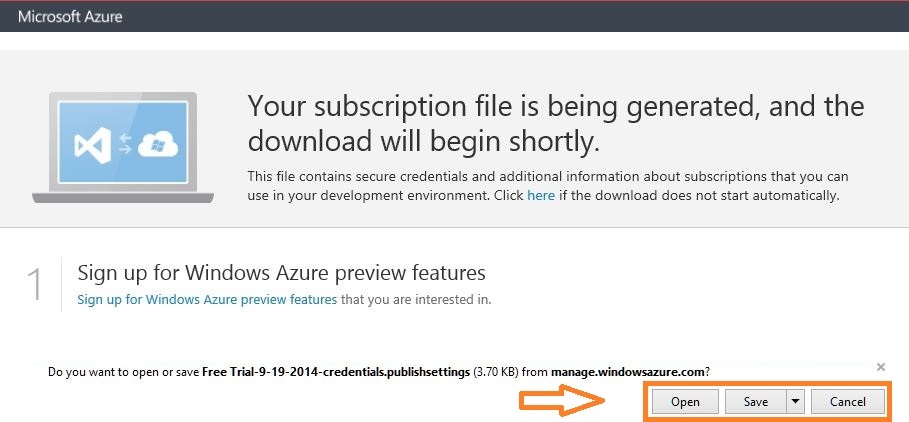
Once you logged, you will be prompted to download azure public setting file.Save the publish settings file on your drive. Refer the below picture.
Now we have to import the saved publish setting file using the below command. Command should point to
This command will install the certificate into your certificate store and will configure your subscription settings.
You can verify the configured subscription by typing the below command. It will display the Subscription ID
# Execution Result
SubscriptionId : b96c19a1-83c0-4614-91bf-402074vf4ae7
SubscriptionName : Free Trial
Environment : AzureCloud
SupportedModes : AzureServiceManagement
DefaultAccount : BD555B5D40D53783C2BC366E2CD49A49EA459906
Accounts : {BD555B5D40D53883C2BC366F2CD49A49EA459906}
IsDefault : True
IsCurrent : True
CurrentStorageAccountName :
Now we have to select the subscription
# You can use (Get-AzureSubscription).SubscriptionName to get the subscription name.Make sure that you are typing the correct subscription name as displayed..
Verify the subscription using the below command
PS C:> get-AzureSubscription -Default
PS C:>
Affinity Group Creation And Set the Storage Account to be used by new affinity group
Affinity Groups are a way you can group your cloud services by proximity to each other in the Azure data center in order to achieve optimal performance. When you create an affinity group, it lets Azure know to keep all of the services that belong to your affinity group as physically close to each other as possible. For example, if you want to keep the services running your data and your code together, you would specify the same affinity group for those cloud services. They would then run on hardware that is located close together in the data center. This can reduce latency and increase performance, while potentially lowering costs.
#Execution Result
VERBOSE: 11:46:25 AM – Begin Operation: New-AzureAffinityGroup
VERBOSE: 11:46:28 AM – Completed Operation: New-AzureAffinityGroup
OperationDescription OperationId OperationStatus
——————– ———– —————
New-AzureAffinityGroup 2c6aa8ee-c6eb-1dd6-b67a-213e1c6d0f0d Succeeded
PS C:>
Storage Account Creation :
“To store files and data in the Blob, Table, Queue, and File services in Azure, you must create a Storage account in the geographic region where you want to store the data”
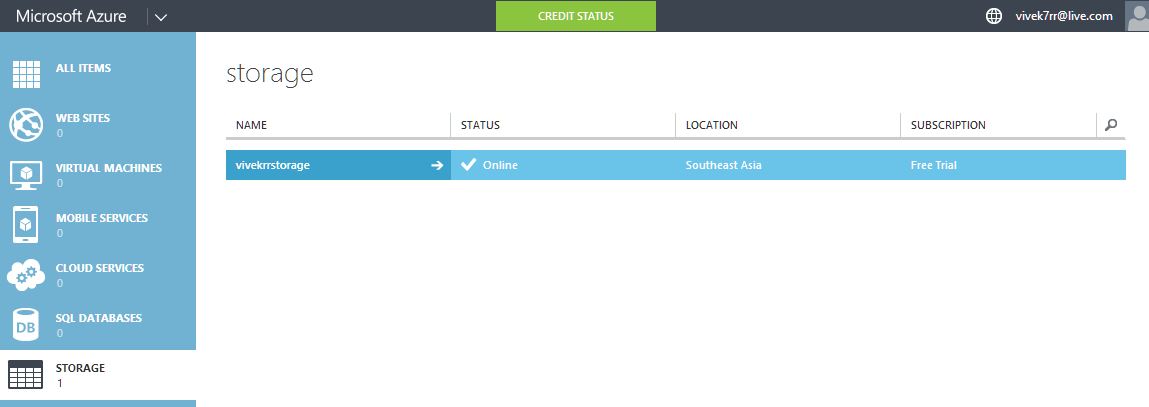
So we need to create a storage account to create VMs ( To save VHDs ) . Follow the below steps to do that. Sharing the present status of my storage account.
Before creating storage account, we have to know which location has to be selected. So find out the list of location available in azure and select accordingly.
PS C:> (Get-AzureLocation).Name
#Execution Result
South Central US
Central US
East US 2
East US
West US
North Europe
West Europe
East Asia
Southeast Asia
Japan West
We got some location list as shown above, and we are going to select “Southeast Asia” as our location.
After the creation of storage account, we have to disable Geo replication option (Optional) if you are using the LAB locally.
* Storage Account Name will accept only small letters and numbers. Do Not Give Capital Letter
PS C:>New-AzureStorageAccount -AffinityGroup “VivAffGrp” -StorageAccountName “vivekrrstorage” -Label “VIVEKRRLAB” -Description “My Storage Account” -Verbose
PS C:> Set-AzureStorageAccount -StorageAccountName vivekrrstorage -GeoReplicationEnabled $false -Verbose
#Execution Result
VERBOSE: 10:45:59 AM – Begin Operation: Set-AzureStorageAccount
VERBOSE: 10:46:04 AM – Completed Operation: Set-AzureStorageAccount
OperationDescription OperationId OperationStatus
——————– ———– —————
Set-AzureStorageAccount 5239ec4f-18f3-1925-9f1d-5fa4a34561e9 Succeeded
Storage Account is ready in Azure : Note the below storage account name
Once we created the storage account, set it as like the current storage account to be used for your default subscription. Follow the below steps and confirm that the current storage account name (vivekrrstorage) is displayed in your subscription.
PS C:> Set-AzureSubscription -SubscriptionName “Free Trial” -CurrentStorageAccountName “vivekrrstorage”
#Confirm that the subscription has been set or not
PS C:> Get-AzureSubscription
#Execution Result
SubscriptionId : b96c19a1-83c0-4614-91bf-402074cf4ae7
SubscriptionName : Free Trial
Environment : AzureCloud
SupportedModes : AzureServiceManagement
DefaultAccount : BD555B5D40D53783C2BC366F2CD49A49EA459906
Accounts : {BD555B5D40D53783C2BC366F2CD49A49EA459906}
IsDefault : True
IsCurrent : True
CurrentStorageAccountName : vivekrrstorage
Now you will be able to see the current storage account name has updated with its value (vivekrrstorage).
Cloud Service Creation:
Cloud Service: By creating a cloud service, you can deploy a multi-tier web application in Azure, defining multiple roles to distribute processing and allow flexible scaling of your application. A cloud service consists of one or more web roles and/or worker roles, each with its own application files and configuration. Azure Websites and Virtual Machines also enable web applications on Azure. The main advantage of cloud services is the ability to support more complex multi-tier architectures. For a detailed comparison,
Please note that there is no cloud service created yet..

PS C:> New-AzureService -ServiceName “CloudServiceViv” -AffinityGroup “VivAffGrp” -Label “VIVEKRRLAB” -Description “My Cloud Service” -Verbose
#Execution Result
VERBOSE: 1:16:10 PM – Begin Operation: New-AzureService
VERBOSE: 1:16:14 PM – Completed Operation: New-AzureService
OperationDescription OperationId OperationStatus
——————– ———– —————
New-AzureService edbcd0e0-867a-18e5-a215-2fd2a2937bb3 Succeeded
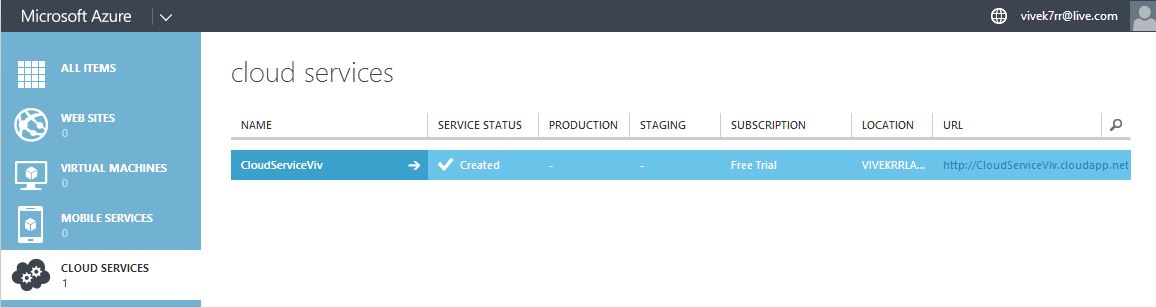
Cloud Service is ready now … You can type Get-AzureService to check the status..
Get Ready To Create VMs 🙂
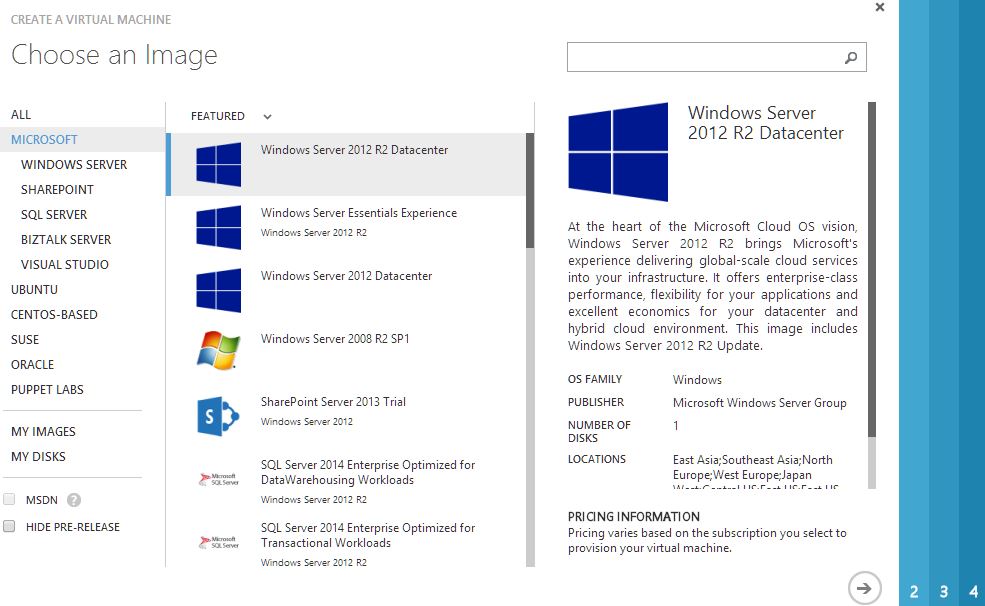
The first step is to decide that, which Image (or OS) you are going to deploy in Azure. There are many Images available in azure gallery.So we need to find out the Image name to deploy it. If you want you can log in and check Image availability in Azure. Below is the VM gallery snap from Azure Portal
Now we are going to fetch the same details through powershell
Get-AzureVMImage is the Cmdlet to retrieve all the available VMs Images from Azure Portal.. As per the above snap shot Windows Server 2012 R2 Datacenter is the Imagefamily Name of an Image. So first you go ahead and type Get-AzureVMImage and see how the out put is !!!
Image Family : Image Family is a Property field of Azure VM Image (Display Name)
PS C:>(Get-AzureVMImage).ImageFamily
#Execution Result
Visual Studio Professional 14 CTP 2 on Windows Server 2012 R2
RightScale Linux v13
RightScale Linux v13
RightScale Linux v14
JDK 6 on Windows Server 2012
JDK 6 on Windows Server 2012
JDK 7 on Windows Server 2012
JDK 7 on Windows Server 2012
JDK 8 on Windows Server 2012 R2
JDK 8 on Windows Server 2012 R2
JDK 8 on Windows Server 2012 R2
Oracle Database 11g R2 Enterprise Edition on Windows Server 2008 R2
Oracle Database 11g R2 Enterprise Edition on Windows Server 2008 R2
………………………………………………………………………………………..
more
#Total Images Available in Azure Portal
PS C:>((Get-AzureVMImage).ImageFamily).count
#Execution Result
253
Have a check on any Images and see all the property. Below I am checking a Linux Image.The same way you can check a Windows Image by giving the Image Family Name.
First property is the Name of Image (Vhd)
PS C:> Get-AzureVMImage | ? {$_.ImageFamily -eq “RightScale Linux v13”} | select -First 2
#Execution Result
ImageName : 0b11de9248dd4d87b18621318e037d37__RightImage-CentOS-6.2-x64-v5.8.8.1
MediaLink :
LogicalSizeInGB : 10
AffinityGroup :
Category : Public
Location : East Asia;Southeast Asia;North Europe;West Europe;Japan West;Central US;East US;East US 2;West US
Label : RightImage CentOS 6.2 x64 v5.8.8.1
Description : CentOS 6.3 with RightLink 5.8.
Eula : http://support.rightscale.com/12-Guides/RightLink/RightLink_End_User_License_Agreeement
ImageFamily : RightScale Linux v13
PublishedDate : 8/28/2012 5:30:00 AM
IsPremium : False
IconUri :
SmallIconUri :
PrivacyUri : http://www.rightscale.com/privacy_policy.php
RecommendedVMSize :
PublisherName : RightScale with Linux
OperationDescription : Get-AzureVMImage
OperationId : 053fe9cd-7e9f-1a4c-a6d4-601184234ba6
OperationStatus : Succeeded
Creation of Virtual Machine and Provisioning Configuration :
We are going to create a Windows Server VM. So first we need to find out the exact name of the VM using the below command. Refer the above Image Gallery Screen Shot.
Here I am selecting the last Image of “Windows Server 2012 R2 Datacenter”. There are different images available in azure portal for the same OS. Most probably last Image will be the latest image released from Microsoft. You can check the published date as well to confirm the latest Image.
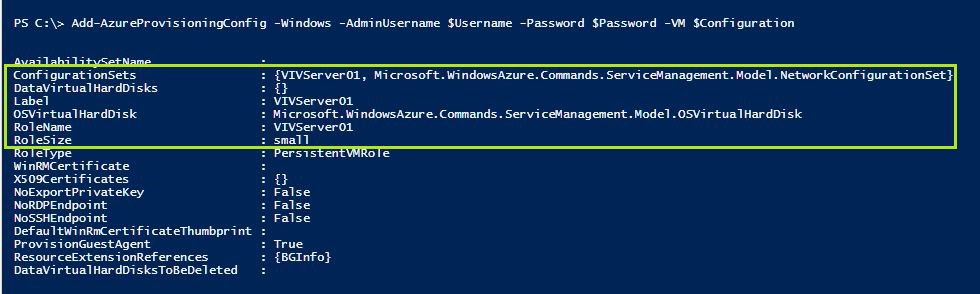
- Creating Virtual Machine Configuration:
$Image = $SelectedVM.Imagename

- Adding Provisioning Configuration :
$UserName = “vivadmin”
$Password = “Image@123”
- Network Part
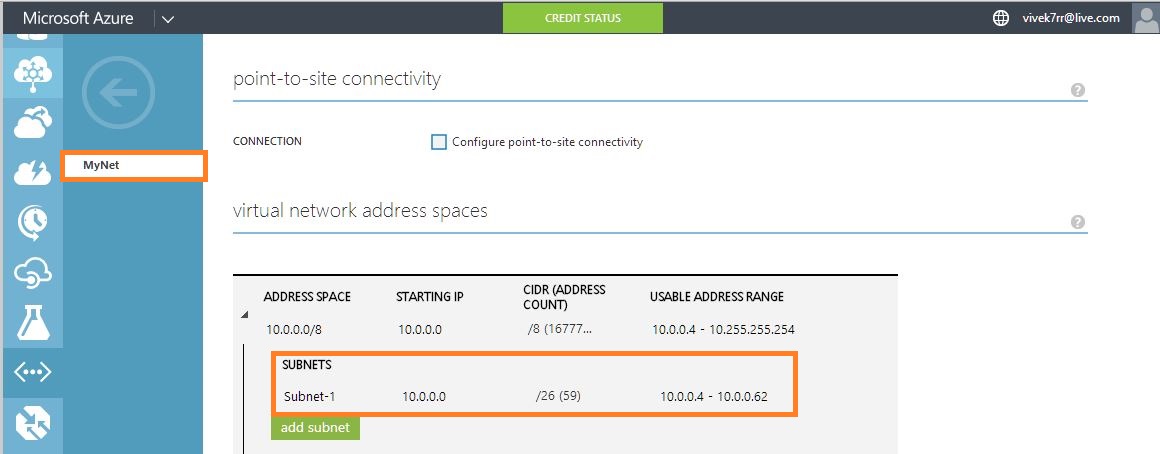
PS C:>Set-AzureSubnet -SubnetNames DC001 -VM $Configuration
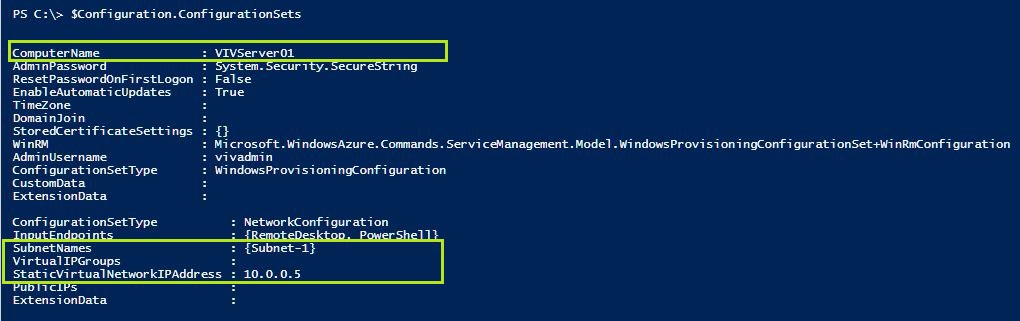
#Just Verify the Configuration
PS C:>$Configuration.ConfigurationSets
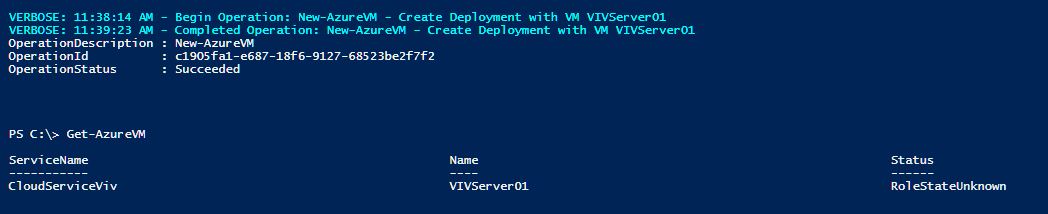
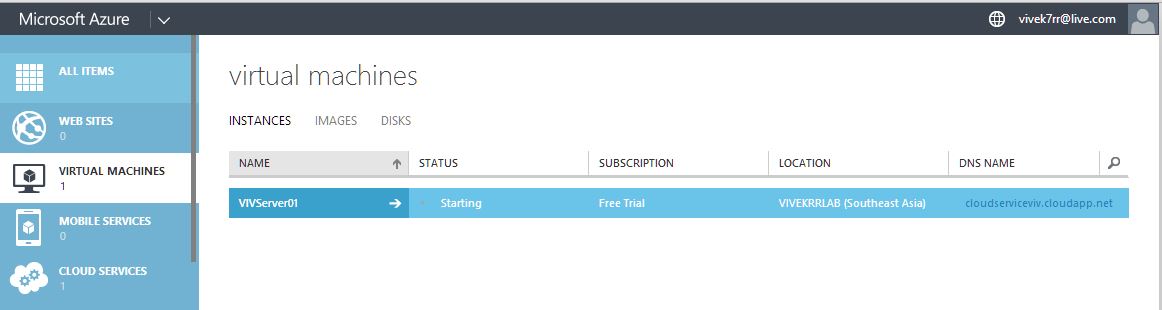
Now you can start using the new VM by connecting from Azure portal or through Powershell (PS Session).